Difference between revisions of "Authorization code usecase 1"
Pavel.lobko (talk | contribs) |
Pavel.lobko (talk | contribs) |
||
| Line 30: | Line 30: | ||
;Step 2 | ;Step 2 | ||
:i2Rest Client will provide you with link - go ahead and follow it. | :i2Rest Client will provide you with link - go ahead and follow it. | ||
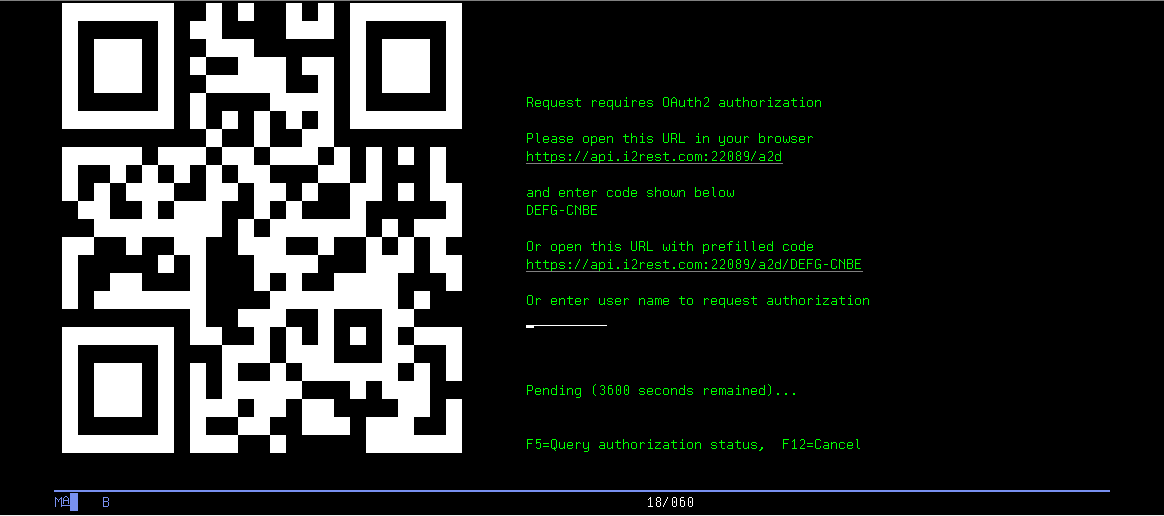
| − | :[[File:Authorization_code_usecase1-1.png]] | + | :[[File:Authorization_code_usecase1-1.png|600px]] |
<br> | <br> | ||
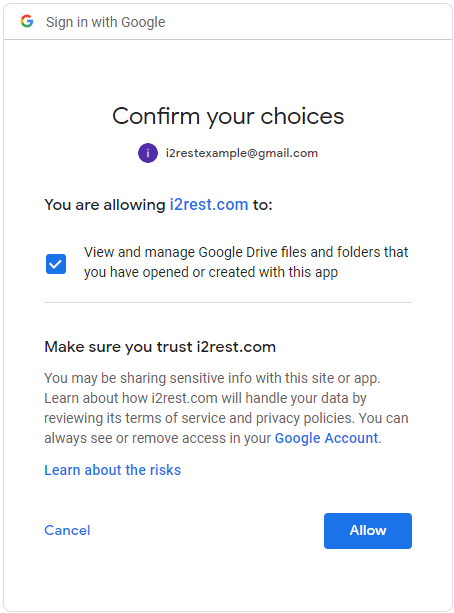
| − | :Find yourself on | + | :Find yourself on i2Rest bridge page. Enter the Proceed with "Next" button. |
:[[File:Device-flow-usecase1-2.png]] | :[[File:Device-flow-usecase1-2.png]] | ||
<br> | <br> | ||
Revision as of 12:23, 3 June 2020
Lets walk step by step through our example with creating "i2rest.doc" file on "i2restexample" user Google Drive
- Preparations
- At the very beginning your application should be registered as a client (obtaining Device ID and Device Password) on Google (see details).
- Add Google.com SSL certificate CA to your DCM.
- Register your i2Rest Client on your i2Rest Server as a client to enable "bridge mode"
- Step 1
- Execute command
I2REST COMMAND(*Get)
       URL('https://www.googleapis.com/drive/v3/files')
       OUTPUT(*JOBLOG)
       DCMCLIENT(MYCLIENT)
       AUTHMETHOD(*BRIDGE)
       AUTHID('677815701888-aj80fure8f1laqd3dqvpqtmlandni5an
              .apps.googleusercontent.com')
       AUTHPW(tI2ezmVGioGwrGk9K2O23Mv5)
       AUTHURL('https://accounts.google.com/o/oauth2/v2/auth
               ')
       TOKENURL('https://oauth2.googleapis.com/token')
       SCOPE('https://www.googleapis.com/auth/drive.file')
       BRIDGEURL('https://api.i2rest.com:22089/a2d')
       BRIDGEID(OAUTH21)
       BRIDGEPW(oauth21)
- Step 2
- i2Rest Client will provide you with link - go ahead and follow it.

- Find yourself on i2Rest bridge page. Enter the Proceed with "Next" button.
- File:Device-flow-usecase1-2.png
- Grant access to requested scope.

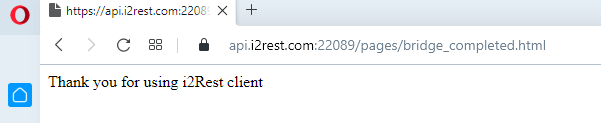
- And now we are on the redirection URL page

- Check the result!
- Here is server response:
Server response (status 200, shown 214 bytes of 214):
    {
     "kind": "drive#fileList",
     "incompleteSearch": false,
     "files": [
      {
       "kind": "drive#file",
       "id": "1b-aQhiVeXgAQZVYeftIpuBo2GCvKQzHz",
       "name": "i2rest.doc",
       "mimeType": "application/msword"
      }
     ]
    }